Introduction
If you’ve been searching for the most effective upper body exercise you can do without leaving your living room, how to do dips exercise at home is probably on your radar. And for good reason: dips are one of the most powerful bodyweight movements available, hitting your chest, triceps, shoulders, and core simultaneously.
Here’s what most fitness content won’t tell you: dips exercise at home isn’t just about having a bar. I’ve trained hundreds of people in home gym settings over the past 8 years, and I’ve seen dips transform physiques faster than nearly any other movement. The secret? Proper progression and understanding the mechanics.
In this guide, I’m going to walk you through everything from the basics of how to do dips exercise at home to advanced variations that will challenge even experienced lifters. Whether you’re a complete beginner or someone returning to fitness, you’ll find actionable steps, common mistakes to avoid, and honest product recommendations that I’ve personally tested.
What Are Dips? And Why Should You Care?
Before we dive into the “how,” let’s establish the “why.” A dip is a vertical pressing movement where your body weight becomes the resistance. When you perform dips exercise at home, you’re engaging multiple muscle groups in one fluid motion this is what fitness professionals call a compound movement.
The primary muscles worked during dips include:
- Triceps (the back of your arms) this is where you feel the burn most
- Chest (pectoralis major and minor) especially with a forward lean
- Shoulders (anterior deltoids) stabilizers during the movement
- Core (abdominals and stabilizers) engaged throughout for balance
What I love about teaching how to do dips exercise at home is that it’s scalable. You can regress it for beginners or progress it for advanced athletes. That’s why dips work for everyone.
The Challenge: Why Most People Fail at Home Dips
Here’s the honest truth: learning how to do dips exercise at home is harder than learning in a gym. Why? Equipment limitations. You need something stable to grip and support your body weight. Many people try dips on chairs or couches and either hurt themselves or give up in frustration.
I’ve seen three main obstacles:
- Unstable surfaces – using chairs that slide or tip
- Inadequate grip width – not enough space for proper hand placement
- Form breakdown – rushing into full dips before building strength
The good news? All three are entirely preventable. Let me show you how.
Equipment Options: What You Actually Need for Home Dips
When people ask me “how to do dips exercise at home,” the first question I ask back is: “What do you have available?” You don’t need expensive equipment. Here are your realistic options:
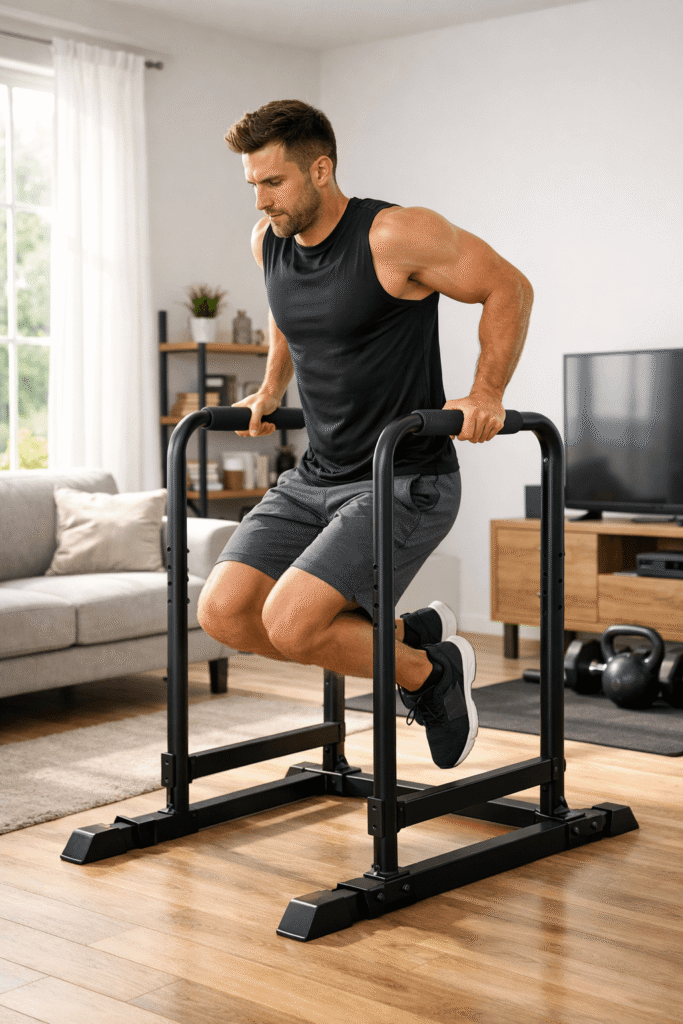
Option 1: Dip Station or Dip Belt Stand (Best Choice)
A dedicated dip station is the gold standard for home dips. These are designed specifically for this movement, offering stability and safety. The investment is worth it if you’re serious about upper body training.
[Bestselling Home Dip Station ]
Why I recommend it: Adjustable height, stable frame, and you can add weight with a dip belt as you progress. Price range: $100–$300.
Option 2: Parallel Bars or Gymnastics Bars
If you have access to parallel bars (sometimes found in parks), they work perfectly for dips exercise at home or outdoors. They offer excellent grip width and stability.
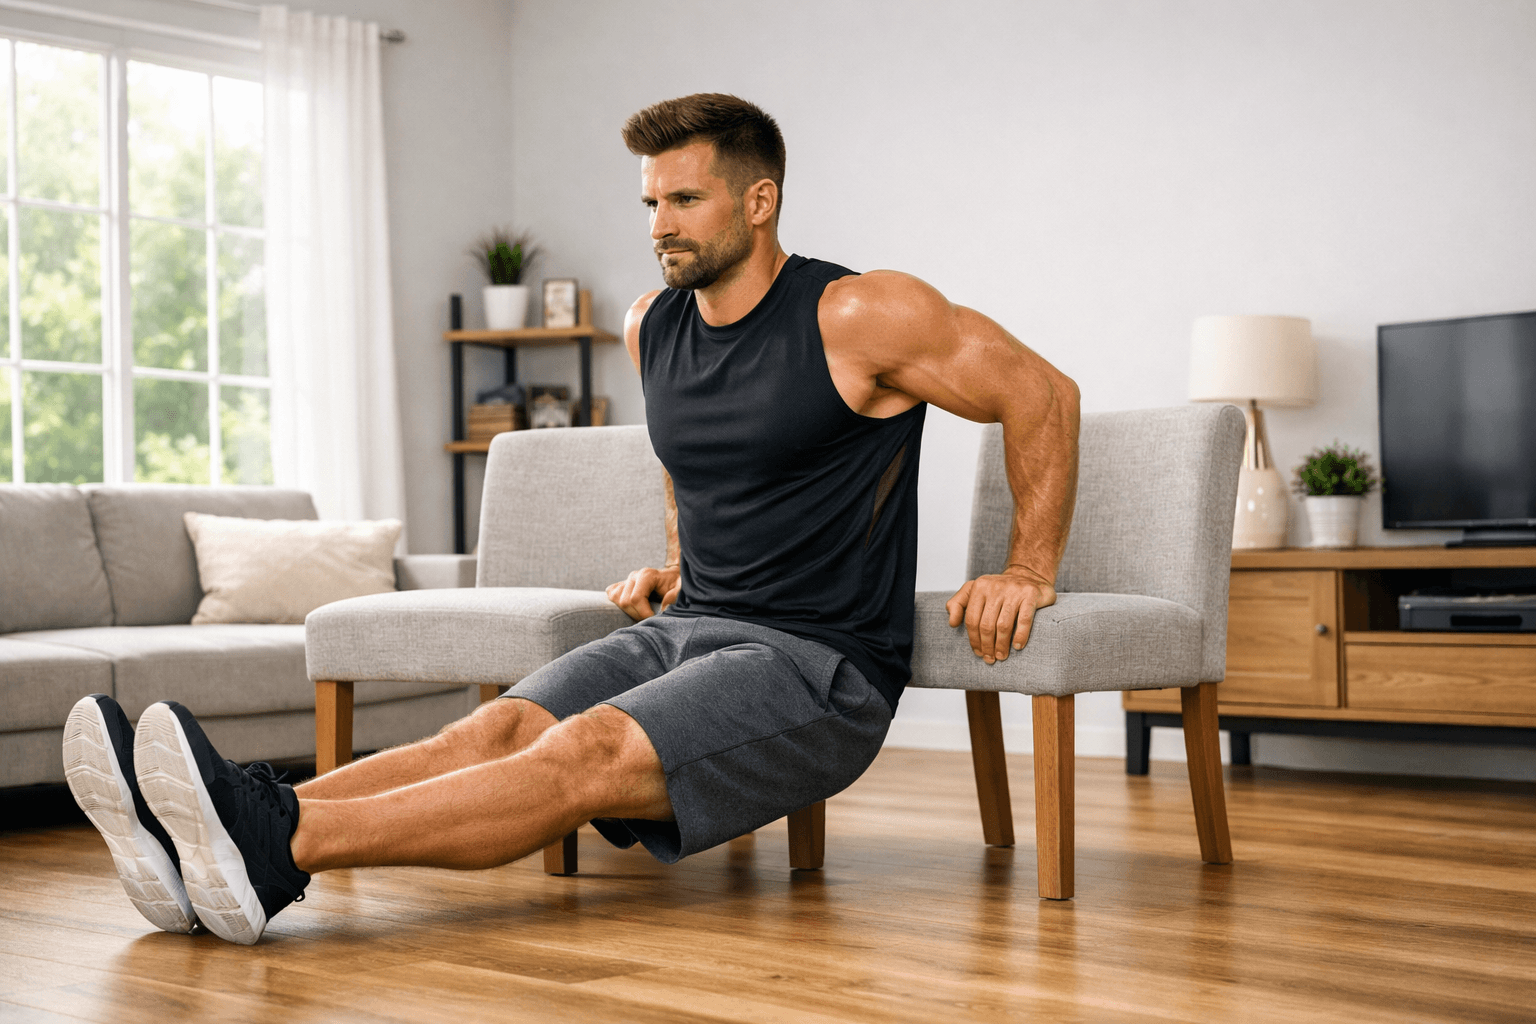
Option 3: Sturdy Furniture (Temporary Solution)
Using a couch, bench, or sturdy chair works, but with caveats:
- Ensure it doesn’t slide (place it against a wall)
- Make sure it can handle your body weight (test it first)
- This is best for negative dips or assisted variations
[Non-Slip Furniture Pads ]
Why I recommend it: Prevents your setup from sliding during dips exercise at home. Inexpensive and practical.
Option 4: Resistance Bands for Assisted Dips
Bands are a game-changer for learning how to do dips exercise at home if you lack upper body strength. They reduce effective body weight, making the movement accessible.
[ Heavy-Duty Resistance Band]
Why I recommend it: Versatile, affordable, and durable. These aren’t just for dips you’ll use them for dozens of exercises. Price: $25–$50.
Step-by-Step Guide: How to Do Dips Exercise at Home with Proper Form
Let me break this down into actionable steps. I recommend starting with a progression and building up over 2–3 weeks before attempting full dips.
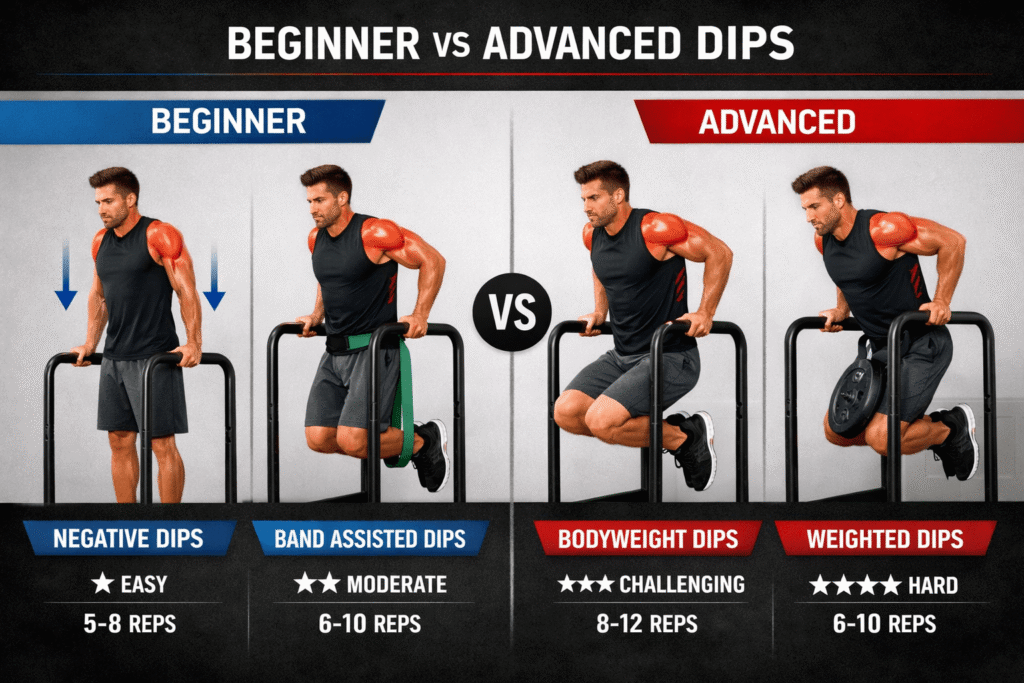
Step 1: Negative Dips (Start Here if You’re New)
What it is: You jump or step up to the top position, then slowly lower yourself down without pushing back up.
How to perform it:
- Position yourself at the top of your dip station, bars, or sturdy surface
- Grip with hands shoulder-width apart (or slightly wider)
- Engage your core and straighten your arms
- Lower yourself slowly over 3-4 seconds, bending your elbows
- Step down or jump down when you reach the bottom
- Rest for 30-60 seconds
- Repeat for 3-5 sets of 3-5 reps
Why this works: Negative reps build strength quickly because your muscles are stronger during the lowering phase. This is the foundation for learning how to do dips exercise at home safely.
Common mistake: Lowering too quickly. Slow and controlled is the goal here.
Step 2: Band-Assisted Dips (Intermediate Option)
If negative dips feel too challenging, use a resistance band.
How to set it up:
- Loop a resistance band over the top of your dip station or bar
- Step into the bottom of the band with one or both feet
- Position yourself at the top of the dip station
- The band will provide upward assistance as you lower and rise
How to perform band-assisted dips:
- Grip the bars with hands shoulder-width apart
- Engage your core and lower yourself by bending your elbows
- Go down only as far as your shoulder flexibility allows (90 degrees or slightly deeper)
- Press through your hands to return to the starting position
- Perform 3 sets of 8-12 reps
Why this helps: Bands reduce the resistance by 20-80%, depending on thickness. This is perfect for building confidence and strength before attempting full dips exercise at home.
Step 3: Full Dips (The Real Deal)
Once you can perform 5+ band-assisted dips cleanly, you’re ready.
How to perform full dips:
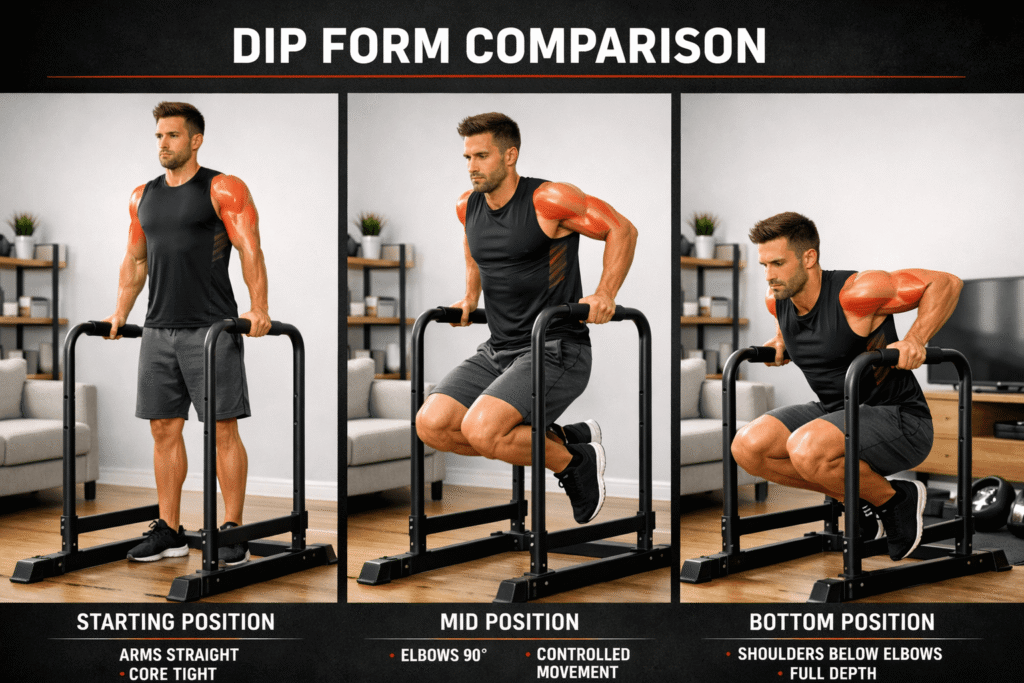
- Starting Position: Stand at your dip station and grip the bars with hands shoulder-width apart (around 12 inches). Engage your core.
- The Descent: Lower your body by bending your elbows. Keep your elbows relatively close to your body to emphasize triceps. Let your shoulders drop, but don’t shrug. Lower until your elbows reach approximately 90 degrees (or slightly past if flexibility allows).
- The Ascent: Press through your palms and straighten your arms to return to the top. Exhale as you press up.
- Breathing: Inhale as you lower, exhale as you press up.
- Reps and Sets: Start with 3 sets of 5-8 reps. As you build strength, aim for 3 sets of 10-15 reps.
Pro tip: A slight forward lean engages more chest; an upright posture emphasizes triceps. Experiment to find your preferred angle.
Common Form Mistakes When Learning How to Do Dips Exercise at Home
Even with good intentions, form breaks down. Here are the mistakes I see most often:
Mistake #1: Elbows Flaring Out
Your elbows should stay relatively close to your body. When they flare outward, you shift load away from the triceps and toward the shoulder joints—this increases injury risk.
Fix: Think about pushing your elbows back and down, not out.
Mistake #2: Shoulder Shrugging
Some people unconsciously shrug their shoulders toward their ears during dips exercise at home. This tightens your shoulders and wastes energy.
Fix: Keep shoulders relaxed and pressed downward throughout.
Mistake #3: Going Too Deep Too Fast
Dropping too low before your shoulders are ready is a quick way to injure yourself. Range of motion should build gradually.
Fix: Start with 60-70 degrees of elbow bend and gradually increase depth over weeks.
Mistake #4: Neglecting Your Core
Your core isn’t just your abs. If you let your body swing or your hips drift, you’re not stabilizing properly.
Fix: Brace your core before each rep. Imagine someone is about to punch your stomach—tighten appropriately.
Mistake #5: Rushing Progression
Trying full dips before you’re ready leads to failed reps, poor form, and frustration. Progress gradually.
Fix: Follow the progression I outlined above. Spend at least 1-2 weeks at each level.
Advanced Variations: Once You Own Dips Exercise at Home
Once you can perform 12-15+ clean dips, it’s time to progress. Here are variations I recommend:
Weighted Dips
Add weight using a dip belt or by holding a dumbbell between your feet.
[ Adjustable Dip Belt with Chain]
Why I recommend it: Proper weight distribution, comfortable to wear, adjustable for progression. This transforms how to do dips exercise at home into a true strength builder.
Archer Dips (Uneven Load)
Position your hands wider than normal, then as you dip, shift more weight to one arm.
Diamond Dips (Hand Position Variation)
Instead of shoulder-width grip, position your hands close together (forming a diamond shape with your thumbs and index fingers touching). This extreme variation heavily emphasizes the triceps.
Muscle-Up Progression Dips
A dip followed by a pull-up. This requires advanced strength and coordination.
Pros and Cons of Dips Exercise at Home
Pros
✅ Compound movement – Works multiple muscle groups simultaneously
✅ Minimal equipment needed – Just a stable bar or station
✅ Scalable – From beginner negatives to advanced weighted variations
✅ Time-efficient – You can build serious strength in 15-20 minutes
✅ Builds functional strength – Translates to real-world pushing power
✅ Can be done anywhere – Bars, benches, sturdy furniture all work
✅ Progressive overload is easy – Add reps, then depth, then weight
Cons
❌ Requires baseline strength – You need some upper body strength to start
❌ Shoulder mobility needed – Limited range of motion if tight shoulders
❌ Equipment can be unstable – Using furniture is less safe than dedicated equipment
❌ Learning curve exists – Proper form takes time to master
❌ Risk of shoulder impingement – With poor form or excessive depth
❌ Can be intimidating for beginners – The movement looks harder than it is
[IMAGE PLACEHOLDER #3]
How Often Should You Train Dips at Home?
Programming matters. Here’s what I recommend:
Beginners (First 4 weeks):
- 2 days per week
- 3 sets of 5-8 reps
- 48-72 hours rest between sessions
Intermediate (Weeks 5-12):
- 2-3 days per week
- 3-4 sets of 8-12 reps
- Can train on consecutive days if using different variations
Advanced (12+ weeks):
- 2-3 days per week with varied intensity
- Can do weighted dips 1-2x weekly and high-rep variations 1-2x weekly
Important note: Dips are demanding on your shoulders and triceps. Don’t do heavy dips more than twice weekly. Recovery matters.
Complementary Exercises to Enhance Your Dips
While how to do dips exercise at home is powerful, combine it with other movements for balanced development:
- Push-ups – Great warm-up; hits chest, shoulders, triceps
- Rows – Posterior chain balance (pull-ups, resistance band rows)
- Shoulder mobility work – Helps with depth and safety
- Core work – Planks, dead bugs, hollow body holds
- Tricep extensions – Isolation for weak points
Safety Considerations and When to Stop
Listen to your body. Here’s when you should pause and reassess:
🛑 Sharp pain in the shoulders – Not the same as fatigue. Sharp pain = stop immediately
🛑 Elbow clicking or popping – Usually fine, but if painful, regress
🛑 Wrist pain – May indicate poor grip angle; adjust hand position
🛑 Lower back pain – Sign of poor core engagement or excess weight
If any of these occur, drop back to band-assisted dips or negatives for 1-2 weeks, then progress more slowly.
Frequently Asked Questions About Dips Exercise at Home
Q1: How Long Does It Take to Master How to Do Dips Exercise at Home?
A: Most people can perform their first full dip within 2-4 weeks of consistent training using the progression I outlined. “Mastering” (10-15+ clean reps) typically takes 6-8 weeks. Everyone is different, though—some take longer, some shorter.
Q2: Can You Build Muscle Doing How to Do Dips Exercise at Home?
A: Absolutely. Dips are one of the best muscle-building movements available. Your triceps, chest, and shoulders will grow noticeably within 8-12 weeks of consistent training. The key is progressive overload—gradually increasing reps, depth, or adding weight.
Q3: Will Dips Exercise at Home Hurt My Shoulders?
A: Not if you train smart. Poor form, going too deep too fast, or excessive volume can cause shoulder issues. Start conservatively, maintain good form, and progress gradually. Most shoulder problems come from ignoring warning signs.
Q4: How Do You Compare Dips Exercise at Home vs. Dips at the Gym?
A: The movement is identical. Gym dip stations are often slightly different ergonomically (slightly wider, sometimes with foot platforms), but home dips work just as well. The advantage of home training is convenience.
Q5: What’s the Best Way to Add Weight When Doing How to Do Dips Exercise at Home?
A: A dip belt with chain is the gold standard. You attach weight plates to the chain, which hangs from your body. This distributes weight evenly. Alternatively, hold a dumbbell between your feet, but this is less stable.
Q6: Can Beginners Learn How to Do Dips Exercise at Home Without Prior Strength?
A: Yes, if you use the progression I outlined (negative dips → band-assisted dips → full dips). Start with 3-4 assisted reps rather than trying to jump straight to full dips. Patience pays off.
Q7: Is Dips Exercise at Home Safe for People With Previous Shoulder or Elbow Issues?
A: Possibly, but with caution. If you have a history of shoulder impingement or elbow problems, consult a physical therapist first. A limited range of motion dip (not going deep) is often safer. Avoid weighted variations until you’re confident.
Building Your Home Dips Training Plan
Here’s a simple 6-week progression plan you can start this week:
Weeks 1-2: Negative Dips
- 3 sets of 5 reps
- 2 days per week
- Lower over 4-5 seconds
Weeks 3-4: Band-Assisted Dips
- 3 sets of 8-12 reps
- 2-3 days per week
- Use a heavy resistance band
Weeks 5-6: Full Dips
- 3 sets of 5-10 reps
- 2 days per week (increase frequency after week 6)
- Focus on form over reps
Once you can hit 3 sets of 12-15 clean reps, you’re ready for weighted variations or increased frequency.
Final Thoughts: Mastering How to Do Dips Exercise at Home
Learning how to do dips exercise at home is one of the best investments you can make in your fitness. This single movement will build upper body strength, muscle, and confidence faster than almost any alternative.
The secret isn’t complicated:
- Start with a progression (negatives → bands → full dips)
- Maintain strict form
- Progress gradually
- Stay consistent
You don’t need a fancy gym membership. You don’t need expensive equipment (though a proper dip station is a worthy investment). You just need patience and consistency.
I’ve seen people transform their physiques using nothing but dips exercise at home and a pull-up bar. The movement is that powerful.
[IMAGE PLACEHOLDER #5]

Ready to Start? Here’s Your Action Plan
- This week: Set up your dip station or identify a safe surface for how to do dips exercise at home
- Next week: Start with negative dips for 3 sessions
- Week 3-4: Progress to band-assisted dips
- Week 5+: Transition to full dips
You have everything you need. The rest is execution.
[FINAL CTA]: If you found this guide helpful, I recommend saving it for reference. Better yet, commit right now to starting the progression. Pick a date, mark it on your calendar, and show up. In 6 weeks, you’ll wonder why you didn’t start sooner.
The best time to master how to do dips exercise at home was yesterday. The second best time is today.
Let me know in the comments: Are you starting with negative dips, band-assisted dips, or do you already have full dip strength?.